

Showing posts with label clothing. Show all posts
Showing posts with label clothing. Show all posts
Friday, 22 August 2014

Monday, 16 June 2014
Ark Clothing: *Wishlist*
ARK is said to have been 'born out of three clubbers love of music and fashion in the 90's rave scene' and is one of the leading retailers in the UK of branded fashion. Labels they stock include Fred Perry, Religion Clothing, Hearts & Bows, Cloak & Dagger, Carhartt, Humor, Glamorous and, my personal favourites, Superdry and Motel Clothing.


What I like about ARK at the moment though is their co-ords trend:
(ARK's full collection of co-ords can be found here)
Co-ords make a great easy outfit for the Spring/Summer and ARK have such a good variety. Their collection includes Floral, Gingham and Neon, to name just a few, all of which would look gorgeous with a pair of shades and some jellies. My favourite out of the three featured above is the HEARTS AND BOWS Mint Green Grid Set (middle) as it seems to shout 'Summer Cool' however the VOGUELAND Ark Cream Carla Set afterwards would make the most stylish combination. Of course, there's always the option of alternating different co-ords you buy, which is especially useful for events such as music festivals. Co-ords are predicted to be a big trend this Summer, so be sure to check out ARK's collection for yourself, you might just like it..
Friday, 23 August 2013
DIY: 'Stardust Walker' Heels
This is a simple but effective DIY which only takes about half an hour but leaves you with unique and gorgeous shoes;
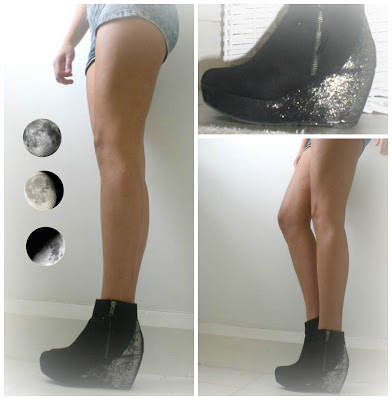
You will need:
- 1 pair of Black Wedged Heels (I recommend buying these from New Look as they aren't too expensive if you mess up.)
- 2/3 bottles of relatively cheap glitter nail polish (I used gold and silver from the Technic range)
- A pencil with a very light lead hardness (anything lighter than HB)
- A basic idea of what you want the pattern to look like. (It may be wise to draw pattern ideas on a piece of paper first.)
How to:
1. Make sure that the shoes are clean enough to work on.
2. Draw a faint outline of your pattern in the pencil mentioned in 'You will need'. (You should only just be able to see the line.)
3. Using the glitter nail polish begin to dab and spread the liquid across the area of your pattern, being careful not to overshoot the faint lines.
4. If you have a second/third colour(s) to add layer these over the top using the same technique.
5. Leave your heels to dry.
Side note: If you want to make sure the glitter definitely doesn't come off, then I suggest that you go over the pattern with clear nail polish after. If you're being a bit more inventive with your pattern you could apply different colours of glitter nail polish in different areas and then layer/not layer them at the edges, the choice is yours!
If you need any more advice then send an e-mail to jessicaannieblog@gmail.com also if you make heels inspired by this DIY you can send them to this e-mail address to have your picture featured on this blog! Keep the e-mail subject the same as the title of the post.

You will need:
- 1 pair of Black Wedged Heels (I recommend buying these from New Look as they aren't too expensive if you mess up.)
- 2/3 bottles of relatively cheap glitter nail polish (I used gold and silver from the Technic range)
- A pencil with a very light lead hardness (anything lighter than HB)
- A basic idea of what you want the pattern to look like. (It may be wise to draw pattern ideas on a piece of paper first.)
How to:
1. Make sure that the shoes are clean enough to work on.
2. Draw a faint outline of your pattern in the pencil mentioned in 'You will need'. (You should only just be able to see the line.)
3. Using the glitter nail polish begin to dab and spread the liquid across the area of your pattern, being careful not to overshoot the faint lines.
4. If you have a second/third colour(s) to add layer these over the top using the same technique.
5. Leave your heels to dry.
Side note: If you want to make sure the glitter definitely doesn't come off, then I suggest that you go over the pattern with clear nail polish after. If you're being a bit more inventive with your pattern you could apply different colours of glitter nail polish in different areas and then layer/not layer them at the edges, the choice is yours!
If you need any more advice then send an e-mail to jessicaannieblog@gmail.com also if you make heels inspired by this DIY you can send them to this e-mail address to have your picture featured on this blog! Keep the e-mail subject the same as the title of the post.
Monday, 12 August 2013
Recent Purchase: Black Wet Look Skater Skirt
I'm going to be honest, I've been meaning to get a new skater skirt for ages now and my brother's 30th birthday seemed the perfect excuse to get one;
 My favourite thing about this skirt is that it is actually made from ultra-versatile scuba fabric. I was initially going to get a leather skirt until I saw this - yet everyone seems to think the skirt is made from leather! The difference between the scuba material and leather is that the material is a lot smoother and nicer to wear. It literally looks no different to a leather skater skirt and if you're planning on buying a leather skater skirt I recommend buying this one instead. The skirt also seems to cost less than most leather skirts. I bought mine from boohoo.com for £12.00 and it arrived via next day delivery! This was the first time I had got round to using boohoo.com to buy clothing so I was slightly apprehensive (in case the skirt didn't fit etc.) However the site does give you a 'size guide' which is really reassuring as you can double check you're ordering the correct size for your measurements.
I'm really happy with the quality of my skirt and I think it may well become a wardrobe staple for me throughout A/W 2013. Here's a link to the skirt itself in case you wish to buy it.
Follow on Bloglovin'
I'm really happy with the quality of my skirt and I think it may well become a wardrobe staple for me throughout A/W 2013. Here's a link to the skirt itself in case you wish to buy it.
Follow on Bloglovin'
Friday, 2 August 2013
Snapshot Lookbook: Hear Nostalgia

- DIY Dress (Vintage)
- Nail Polish in Turquoise "Siona Island" from Technic
-Rings from Topshop
- Floral Scarf (Vintage)
- Jade Shoulder Chocolate Handbag from Fiorelli
- Black Wedged Boots New Look
- Leather Jacket Miss Selfridge
- Neal's Yard Moisturiser
I'm now on Instagram so feel free to follow http://instagram.com/jesssannie#
Monday, 1 July 2013
#GetInMySuitcase

For #GIMS I thought I'd show you a typical Summer 2013 outfit of mine;
- Sunglasses -Fashion Outlet (local store)
- Earcuff and Earring set -New Look
- Wedged heels -New Look
- Bag -River Island
- T-shirt -New Look
- Shorts -Pieces
- CD -Mumford and Sons 'Babel'
Friday, 28 June 2013
Snapshot Lookbook: Festival Fever

Top left;
- 'Vibes' t-shirt from H&M
- Face painted using eye shadow from Accessorize with water; inspired by Coachella Festival
Top right;
- Lipstick by MaxFactor in Raisin
Bottom left;
- Nail Polish by No7 in Lucky Lilac
- Bracelet handmade in Santorini, Greece
Bottom right;
- Shorts from Label Lab @ House of Fraser
Follow on Bloglovin'
Subscribe to:
Posts (Atom)